
Generation Basics
#Four generation modes
| Mode | Description |
|---|---|
| Txt2Img | Generate from positive and negative prompts |
| Img2Img | Transform an existing image with adjustable denoise strength |
| Inpainting | Selectively edit parts of an image with a built-in canvas mask editor |
| Image Edit | Edit a reference image by describing the change in the prompt |
Switch modes with a single click. Settings carry over between modes. For the inpaint canvas see Inpainting and the Canvas Editor. For instruction-driven editing see Image Edit Mode.
These four are the image modes under Generate. In v2.3.7 and later, Video has its own entry in primary navigation beside Generate and Music, on desktop and mobile. Returning to Generate restores the image mode you last used during the session. Video has its own models and settings panel; see Video Generation.
With a NovelAI model selected, Txt2Img, Img2Img and Inpainting run on NovelAI. Video and the Image Edit tab stay available: Video always runs on ComfyUI with its own models, and a plain Image Edit run with a NovelAI model stops with a message instead of spending Anlas. The model picker switches the backend, and the panels adapt: VAE/LoRA and ComfyUI-only controls are hidden, while NovelAI's characters, references and sampling options appear. See NovelAI Backend for its model limits and costs.
#Page layout
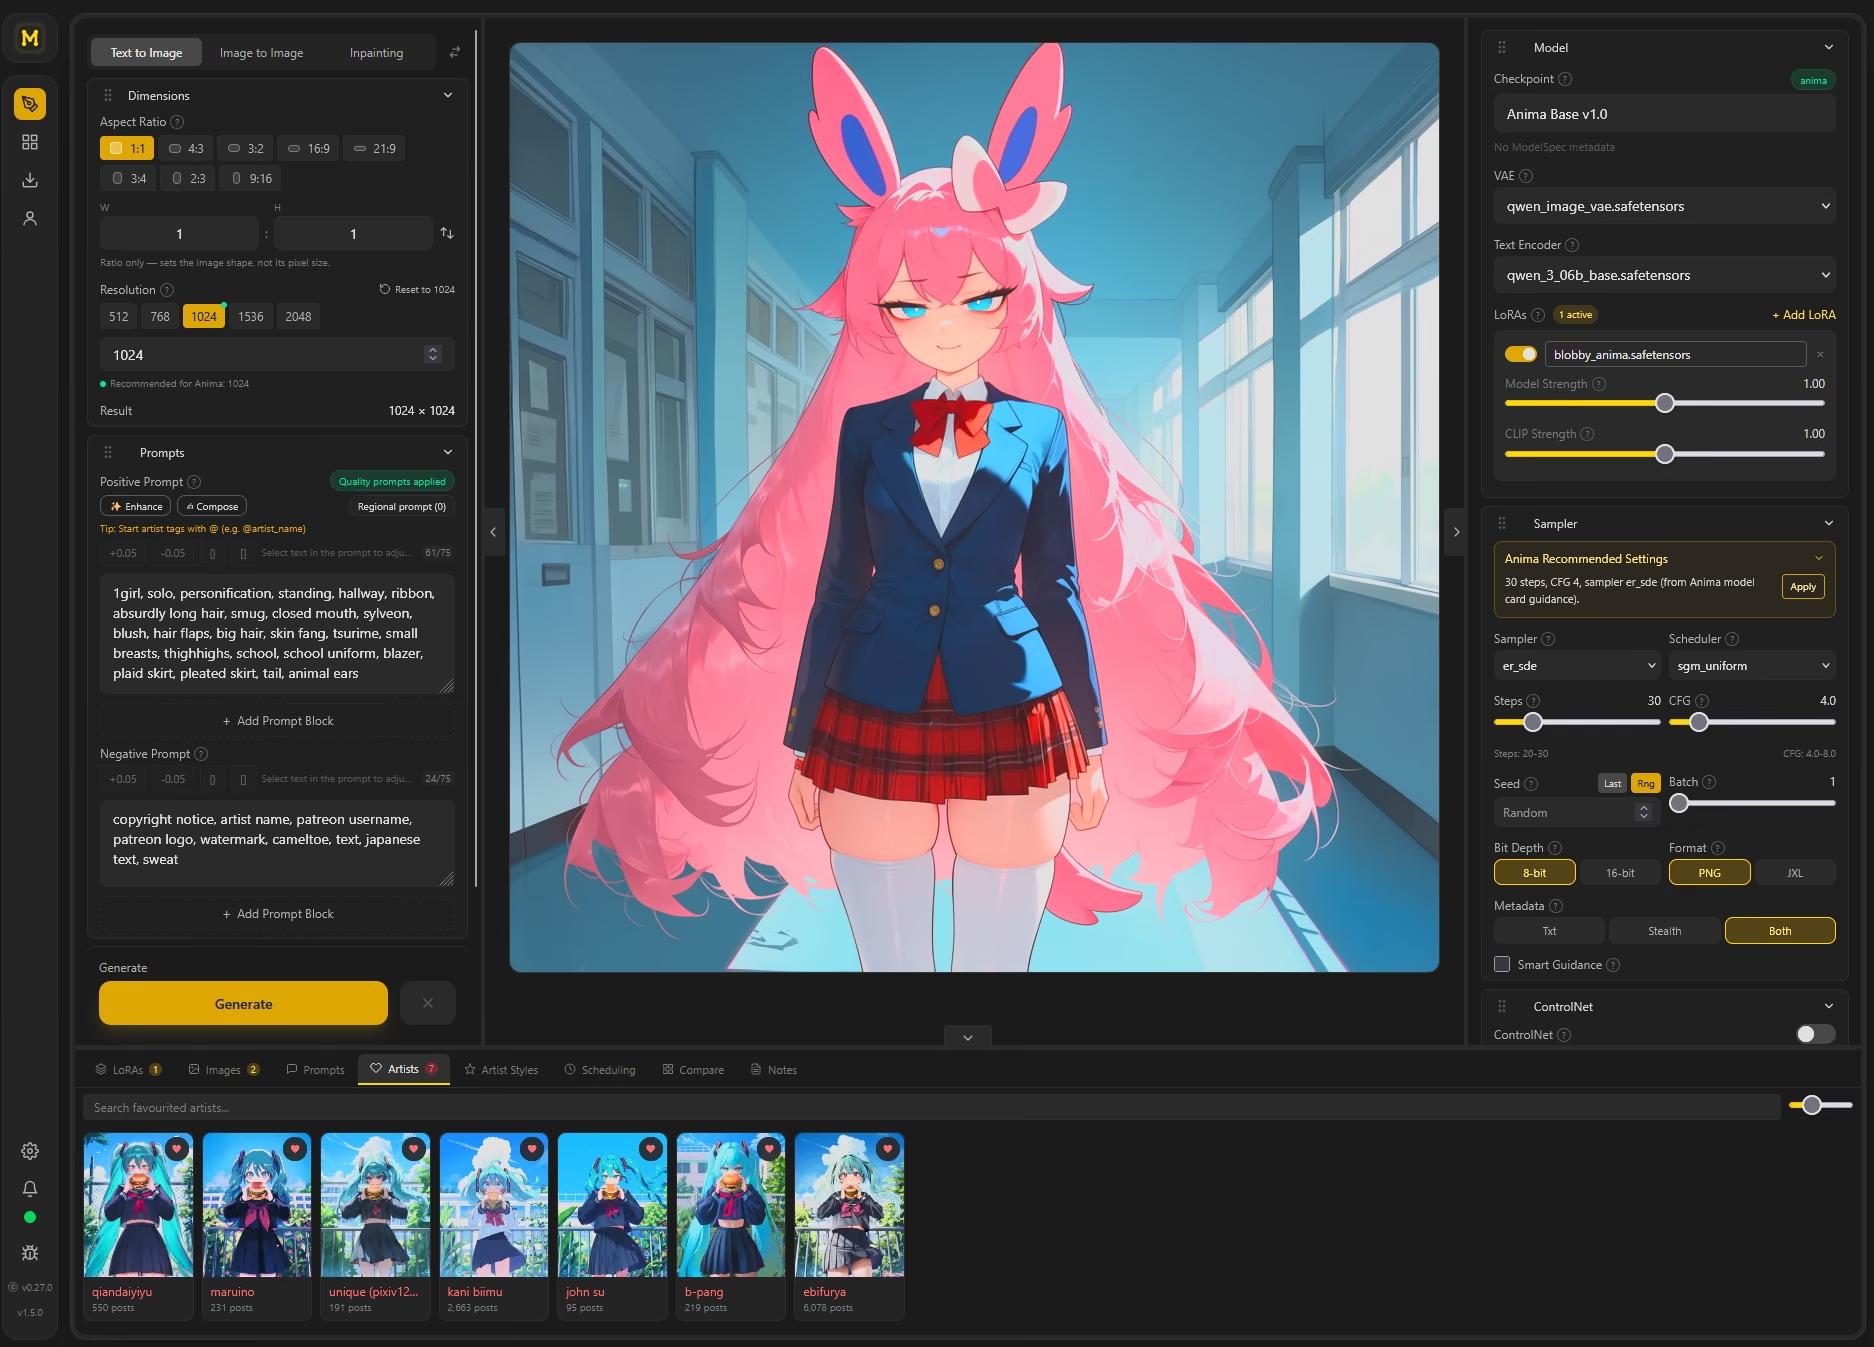
On desktop the Generate page is split into rounded cards: a left panel, a right panel, the preview and the bottom drawer.
- Mode bar: the mode tabs, the Canvas Editor toggle and the Layout menu sit in a bar above the preview.
- Layout menu: Swap left/right panels, Everything on the left, Everything on the right and Reset layout (default sides, section order and panel widths). A fresh install puts Model, Prompts and Dimensions on the left.
- Sections: drag a section by its grip to reorder it, use its arrow to move it to the other side, or collapse it with the chevron. Help text for a control is in the tooltip next to its label.
- Resizing: drag the gap between two cards to resize them. The small button in the middle of each gap hides or shows that side.
- Preview: the preview takes the shape of the image or video it shows (or of the size you set, before there is one) and fills the free space.
- Bottom drawer: the button at the right of the drawer's tab row collapses it to just the tab row. Click any tab to open it again. Image modes and Video each keep their own drawer height and collapsed state.
- Generate footer: pinned under the left panel. It shows the Anlas row when a NovelAI model is selected, a batch stepper (1 to 8, the same value as Batch size), a Stop button while generating (click skips the current image, right-click cancels all), and the Generate button with the estimated Anlas cost inside it.
#Settings tabs
The generate page supports multiple independent settings tabs. The tab strip sits at the top of the main column, beside the sidebar, and is always visible, even with only one tab open. Use it to switch tabs, open a new one or close one.
New tab opens a copy of the current settings. Each tab keeps its own prompt, model, sampler, steps, resolution and generation mode. What stays shared across all tabs: the queue, gallery, canvas input image and app-wide preferences (output format, notifications, autosave directories). Tabs are remembered across restarts.
Each tab keeps its own last image in the preview, so switching tabs switches the preview too. An image that finishes in a background tab waits there instead of replacing what you are looking at.
Profiles saves the current tab's settings under a name. Pick a profile to open it in a new tab, or use Load into this tab to apply it over the current one. Saving under an existing name updates that profile. Profiles only hold tab settings, so app-wide preferences stay as they are, and in browser mode they sync per user.
On desktop: Ctrl+T opens a new tab, Ctrl+W closes the active one, and Ctrl+Tab / Ctrl+Shift+Tab cycles between them.
#Core controls
- Positive and negative prompts - multi-line, manually resizable, with a live CLIP token count (
count/limit) in the top-right corner of each box that turns amber once a prompt spills past the 75-token chunk boundary. An Add Prompt Block button below each box adds extra named prompt blocks that join in order at send time. A toggle beside the Regional prompt button can fold the two boxes into a single combined view with a Positive/Negative tab switcher. See Prompting Guide for the combined view, weighting, additive blocks, wildcards, presets, scheduling, and more. - Checkpoint selector - searchable, auto-populated from ComfyUI, with recommended models that auto-download on selection (progress bar + file size).
- VAE selector - optional override; defaults to the checkpoint's built-in VAE. On split models (Anima, Krea 2, Qwen, Flux 2 and others) the VAE you pick is kept as long as it is installed and fits the model, so a fine-tuned decoder such as a sharpened Qwen Image VAE stays selected. Qwen-based models default to the stock
qwen_image_vae. - LoRA support - add unlimited LoRAs with a Strength slider (0 to 2 in 0.05 steps; double-click resets to 1) that drives both model and CLIP strength together. Click the link icon beside the slider to split them into separate Model Strength and CLIP Strength sliders; click it again to merge back. Per-LoRA enable/disable, searchable dropdown, and an active-count badge. The LoRA list can be collapsed to save space; the state is remembered between sessions. Each LoRA card has a Trigger words field: text you enter there is added to the positive prompt when the LoRA turns on and removed when it turns off. It works offline and does not require CivitAI metadata. Clicking any displayed trigger chip also inserts the word into the positive prompt. See also LoRA presets in the Prompting Guide.
- Sampler and scheduler - all ComfyUI samplers and schedulers. The scheduler dropdown is locked for Flux 2 models, which use a fixed internal scheduler; the panel notes "Flux2 uses a fixed internal scheduler" when this applies.
- Recommended settings - selecting a checkpoint applies the recommended steps, CFG, sampler, scheduler and resolution for its model family, and the sampler panel shows a short card with those values for families that have one (Anima, Nanosaur, NovelAI and others). Advanced Mode in Settings > Quality Tags turns the auto-apply off so your settings carry over between models. See Settings and Accessibility.
- RDBT-Anima LoRA (Anima) - a toggle in the Anima recommended settings card that downloads (about 92 MB, from an unofficial mirror) and applies the community RDBT-Anima guidance-distilled LoRA. It speeds up generation by removing the need for CFG.
- TeaCache (Anima) - when an Anima checkpoint is selected, the sampler panel adds a TeaCache toggle. It reuses the previous step's output on steps where little changed, skipping the forward pass. Off by default; small risk of softer detail when enabled.
- Painterly textures - beta57 (Anima) - when an Anima checkpoint is selected and the RES4LYF node pack is installed, the sampler panel also shows a Painterly textures (beta57) toggle. Enabling it switches the scheduler to the beta57 scheduler from RES4LYF. Steps, CFG and sampler are unchanged; turn it off to go back to the normal scheduler.
- Krea 2 Turbo steps - when a Krea 2 Turbo model (or Wulver) is selected, the sampler panel shows a Krea 2 Turbo steps picker with 8 steps, 4 steps and 2 steps. Picking 4 or 2 downloads a community speed LoRA (418 MB) and sets euler / simple, CFG 1 and the step count. Picking 8 uses stock Turbo with no LoRA. The 2-step option can smear small faces and wide scenes; use 4 steps for final renders.
- Steps - 1 to 150.
- CFG scale - 0 to 30, 0.1 precision.
- Seed - fixed, or -1 for a new random seed each generation.
- Batch size - 1 to 8 images per prompt.
- Denoise strength - 0 to 1 for img2img and inpainting.
#Guidance options
Optional guidance controls appear where the model supports them. NAG and APG are offered for SDXL-family ComfyUI models; they are disabled when the connected ComfyUI lacks the required node/input schema, with a hint to update. These are separate from NovelAI's own guidance controls.
- RescaleCFG - rescales the guidance vector each step so v-prediction checkpoints stop blowing out contrast and saturation at normal CFG. Recommended on for v-pred models. Rescale strength sets how hard the rescale bites; 0.7 is the standard value and lower keeps more of the raw CFG look.
- NAG (attention guidance) - Normalized Attention Guidance applies the negative prompt inside attention, so it keeps working at low CFG and low step counts where ordinary CFG stops doing anything. NAG scale controls how strongly the negative is pushed away; 5 is the default and higher can distort.
- APG (projected guidance) - Adaptive Projected Guidance splits the guidance update into direction and magnitude, so a high CFG improves prompt adherence without oversaturating colors. Eta sets how much of the saturating parallel component is kept (1 behaves like normal CFG, 0 removes it), Norm threshold caps how large the push can get, and Momentum smooths guidance across steps. APG does nothing at CFG 1 or below, and the panel says so rather than staying silent.
#Pause and continue a generation
In Text to Image with a ComfyUI model, Pause at step stops sampling partway and saves a preview. Set it between 1 and the step before the end; 0 completes the image normally.
After the preview appears, change the prompt, CFG, sampler or LoRAs and press Continue from step …. Size, batch size and model must match the paused run, and continuing keeps its original seed. A final continuation can change Steps and Scheduler; Steps is the total, so a run paused at 8 with Steps set to 30 samples 22 more steps. To pause again, choose a later step and keep the original step count, scheduler and sampler noise schedule. Switching between DPM2/UniPC and other samplers is available on a final continuation.
Paint a correction opens the paused preview in the inpaint canvas. Paint the change, mask the area to replace, then press Continue with edit from step …. The correction is blended into the paused latent before the remaining steps run.
The pause stays available after a completed continuation so you can try different endings. Discard paused run starts fresh next time. Pauses live in the current app session; reloading the page or restarting the app clears them. ComfyUI can reuse cached stages when available, or sample those stages again after a cache clear or worker change. Early previews can be noisy, and restarting a sampler does not preserve its internal multi-step history.
Style transfer and Anima TeaCache are disabled for paused runs. Upscaling and face/segment refinement wait until the continuation finishes. Pause and continue do not apply to NovelAI generations.
#Continuous generation
The repeat button next to the batch stepper opens Continuous generation. Set Runs (1 to 999) or pick Until stopped, an optional Delay (s) between runs, and Stop on error. One Generate click then runs the normal generation again and again. Each run waits for the previous image to finish, so nothing piles up in the queue, and each run builds fresh settings, so random seeds and {a|b} wildcards reroll.
The Generate button shows the progress (for example "Generating 3/10"), and the stop button stays visible during the pause between runs. With Stop on error off, a failed image is skipped, but the run still stops after 3 failures in a row. Combined with an In order file wildcard, a set number of runs walks a list one line at a time. See Prompting Guide#file-wildcards.
#DMD2 4-step preset (SDXL)
Use DMD2 (4 steps, CFG 1) is a single toggle that downloads the DMD2 distillation LoRA and switches the sampler to 4 steps, CFG 1, LCM sampler, SGM uniform scheduler. Turning it back off removes the LoRA but leaves the sampler settings alone so you can restore your own. Because it runs at CFG 1, ordinary negative prompts stop applying; NAG is the guidance method that still works there, so pair the two if you need a negative.
#Dimension controls
- Aspect ratio presets - 1:1, 4:3, 3:2, 16:9, 21:9, 3:4, 2:3, 9:16 on every backend. Any ratio can be typed; with a NovelAI model selected only the pixel grid differs (multiples of 64 instead of 8).
- Custom aspect ratio - enter any width/height; the ratio is maintained when you adjust resolution.
- Loaded images set the aspect ratio, not the pixel size - browsing, dropping or pasting an image into img2img, and dropping an image for a metadata import, adopt the image's shape as the aspect ratio at your current side length, exactly as clicking that preset would. The ratio is reduced and snapped to the nearest preset within a small tolerance, so a 1216x832 image reads 3 : 2, and a 1024x1536 image at a 1024 side becomes 832x1216 rather than 1024x1536. The source is fitted to that size when you generate. Two exceptions: dropping an image directly onto the Dimensions section applies its size, and inpainting sizes the canvas to the image so the mask matches it. A locked resolution ignores the image entirely.
- Swap dimensions - one-click width/height swap.
- Resolution slider - 64px to 2048px, dimensions computed from your aspect ratio.
- Lock resolution - toggle next to the resolution controls. Switching checkpoints normally resets width/height to that model's default resolution; enabling the lock keeps your current dimensions fixed through model swaps, the Anima minimum size at generate time, and image edit reference uploads.
#Smart model detection
MooshieUI recognizes a wide range of model architectures and auto-applies optimal sampler, scheduler, steps, CFG, and resolution for each. Highlights:
- Accelerated variants (turbo, lightning, lcm, hyper in the name) get reduced steps and lower CFG automatically.
- Rectified-flow models (SD3, Flux, AuraFlow, Mugen, Nanosaur, and others) inject the correct ModelSampling node with architecture-specific shift values.
- Flux Dev models auto-inject FluxGuidance; Flux Schnell is detected and skipped.
- Models are identified by SHA256 hash (CivitAI AutoV2 format), so renamed files are still recognized.
See Models and the Model Hub for the full list and the model browser.
#Queue panel
When you queue multiple generations, a list icon with a count badge appears on the Generate button. Clicking it opens the Your Queue panel.
The panel shows the currently running item labeled Running with an elapsed-time counter, followed by each pending item in order with its queue position. Per-item actions:
| Action | What it does |
|---|---|
| Move to front | Jumps the item to the top of the pending list |
| Move up | Moves the item one slot earlier |
| Move down | Moves the item one slot later |
| Cancel | Removes the item from the queue |
Two panel-level actions sit at the bottom: Interrupt running stops the active generation immediately (equivalent to the Cancel button in the progress bar), and Clear pending removes every queued item that has not started yet. The panel closes itself when the queue empties.
#Real-time progress
- Live preview of the image as it generates (latent previews over WebSocket).
- Phase labels ("Generating...", "Upscaling...", "Preparing...") with a step counter.
- Progress bar (indigo for generation, emerald for the upscale pass).
- Cancel button to interrupt any generation.
A persistent download banner shows active downloads (models, ControlNet, LLM, etc.) with per-file speed and progress. A notification bell keeps a history of success/warning/error/info messages. On desktop, a collapsible terminal log panel streams live ComfyUI and app output.
#Characters tab
The Characters tab in the bottom panel saves character descriptions for reuse across sessions.
Every user starts with one sample character, Yue, saved for NovelAI and for each local tag model (Illustrious, SDXL, Pony, Anima, SD 1.5). Natural-language models such as Flux get no sample. Delete her like any card and she stays deleted, on every synced device.
The Card size slider in the tab header scales each card's picture from 48 px (the default) to 192 px; bigger cards show more of the prompt. It is saved per device.
Extract from prompt sends your positive and negative prompts, plus any NovelAI character boxes, to the prompt assistant. It returns each character's name, appearance and character tags, and the undesired content (UC) that applies to them. Characters are saved per model architecture; the tab only shows characters saved for the architecture of the model currently selected.
Nothing is saved straight away. Extract opens Name your characters, where each new character has a Character name field filled with the prompt assistant's suggestion. Change any name you like, or untick one to leave it out.
Extract also checks what is already saved. A character that matches a saved card (same name, part of it, a nickname, or the same character by appearance) is not added twice. If it matches word for word it is skipped; if it differs, the same dialog lists it under Already saved, shows the saved card beside what was found and asks Update saved, Save as variant or Disregard.
Use has the prompt assistant work the character into your current prompt: it takes over an unnamed character or joins the cast, updates count tags, and folds in the character's UC. With a NovelAI V4 or V5 model the character goes into a new character box. The result opens in a review showing Now and After, and nothing changes until Apply. Insert as is keeps the plain insert: the prompt text goes into the positive prompt (or an empty character box on NovelAI) and the UC into the negative prompt, without the prompt assistant.
Update refreshes a card from the current prompt. The prompt assistant picks out what the prompt says about that character and ignores the others. Undo restores the card.
Each card shows the character's name on its first line and a picture slot: use the current image, Upload, pick one From gallery, generate a Portrait, or Remove it. Portrait renders a front-on, neck-up portrait with the selected model from the card's prompt (editable), with optional Artist tags, Chunks and Artist Styles on top. NovelAI portraits are 1024 x 1024; local models get a square of about your current pixel count. The portrait goes through the normal queue and becomes the card's picture, with Undo. On NovelAI models that take a Precise Reference (V4.5 today), Use also attaches the picture as a character reference, unless Vibe Transfer is in use or every reference slot is taken, and a notification says which.
The portrait prompt leaves out what a neck-up picture can't show: legwear, shoes, skirts, hands, poses, held items and full-body framing. What was dropped shows under the prompt as Left out chips; click one to put it back. This works on tag and sentence prompts in English, Japanese, Chinese, German, Spanish and Portuguese, and on picked chunks. The Expression box is filled from the last portrait, the card's own expression tags or the usual expression in the character's memory. The ✨ button asks the prompt assistant to pick one from memory or canon. After Generate, the expression is saved to memory as the character's usual expression (with an external LLM provider).
The card's menu also has:
- Add variant and Variant of - variants (an outfit, an older version) sit folded under their character's card. A variant whose parent is deleted stands on its own.
- Copy to - copies the card to another model architecture. Between a tag model and a natural language model the prompt assistant rewrites it for the target; between two tag models it is copied as is.
Export in the tab header saves every character, for every model, to a JSON file. Import adds characters from such a file, skipping any already saved and keeping variants under their parent.
Saved NovelAI characters are also known to Enhance for V5.
On NovelAI V4 and later, the portrait uses a Character prompt for the character's appearance and keeps framing, count and style in the main prompt, matching the way a Use card works. The Character prompt field is editable in the portrait window.
#Editing and memory
Edit opens a window with two tabs. Details holds the name, character prompt and UC. Memory holds the character's memory files: short Markdown notes on who they are beyond their look (personality, backstory, relationships, outfits). Add a New file, start from the suggested files, or import .md and .txt files; each file can be renamed, exported or deleted. Remember asks the prompt assistant to write a fact up as a proper note, tie it to what the notes already say and file it, and shows the change for review first. It also reads the notes of other saved characters the fact names, and a relationship goes both ways: "Mumei is Miku's sister" adds the matching line to Miku's memory too. Write with AI drafts the memory files from canon, the character's prompt and an optional brief, for review. For a variant or other take on a known character (gender-swapped, alternate universe, an original design), what you wrote wins over canon. Nothing is saved until Save. Variants share their parent's memory.
With an external LLM provider (Claude, ChatGPT, Gemini, Grok or a capable model on your own endpoint), Use, Update and Enhance read the notes and turn them into visible details where the scene calls for them. When Enhance works out a lasting detail a note does not have yet (for example the uniform of a character's school), it saves it and shows Saved to memory for next time, with Undo. A card with notes shows a Memory button with the file count.
Characters can be renamed, edited and deleted from the tab. The tab is hidden in video mode and disabled until a model with a known architecture is selected.